Inbound Email Processing: Message routing handles emails sent TO your domains, while webhooks track emails sent FROM your domains. Both use similar HTTP POST mechanisms but serve different purposes.
What is Message Routing?
Message routing is a powerful mechanism for efficiently managing and directing inbound email traffic within your applications. By setting up message routes, you can automatically parse and direct incoming emails to appropriate endpoints based on predefined rules or criteria. This functionality enables you to:Support Ticket Systems
Automatically convert inbound emails into support tickets or customer inquiries
Reply Processing
Handle email replies and integrate them into existing conversation threads
Email-to-Database
Parse and store email content directly in your databases or CRM systems
Automated Workflows
Trigger application logic based on inbound email content and metadata
How Message Routes Work in AhaSend
Email Received
An email is sent to an address on your AhaSend domain (e.g.,
support@yourdomain.com or ticket-*@yourdomain.com)Route Matching
AhaSend checks configured routes to find matching recipient patterns
Email Processing
The email is parsed, processed, and formatted according to your route settings
HTTP Request Sent
AhaSend sends a POST request to your endpoint URL with the email data
MX Record Requirement: Message routing requires your domain’s MX records to point to AhaSend. Without proper MX configuration, AhaSend cannot receive emails sent to your domain.
Prerequisites
Before setting up message routing, ensure your domain is properly configured:Domain Setup
Domain Setup
Required Configuration:
- Domain must be added and verified in your AhaSend account
- MX records must point to AhaSend’s mail servers
- DNS propagation should be complete (may take up to 48 hours)
- Check your domain status in the AhaSend dashboard
- Verify MX records are correctly configured
- Test email delivery to ensure routing works
Endpoint Requirements
Endpoint Requirements
Your Application Endpoint Must:
- Accept HTTP POST requests
- Respond with 2xx status codes (200-299) for successful processing
- Handle JSON payloads up to several MB (if attachments enabled)
- Process requests within 10 seconds to avoid timeouts
- Verify webhook signatures for security
- Implement idempotency using webhook-id headers
- Handle duplicate or retry requests gracefully
Creating Message Routes
Configure message routes in your AhaSend dashboard to start processing inbound emails: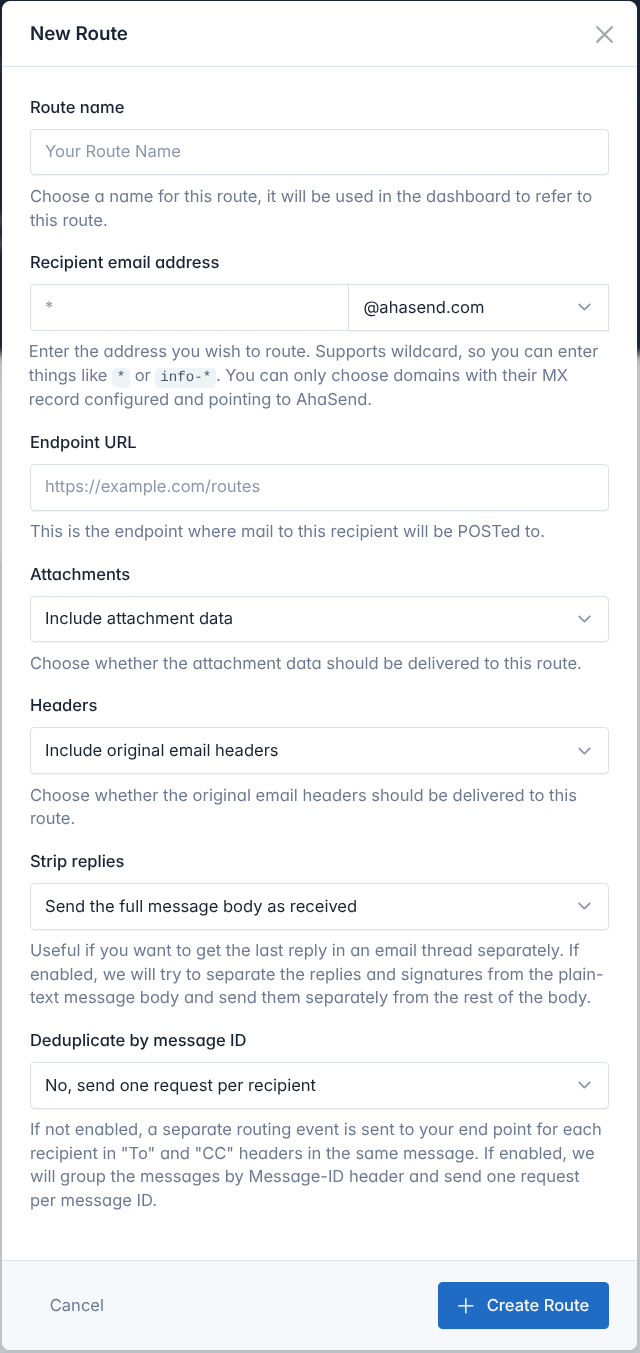
Access Message Routing
- Log in to your AhaSend Dashboard
- Navigate to the Routes section from the main menu
- Click the “Add Route” button
Configure Endpoint URL
Enter Your Endpoint URL:
- Provide the complete URL where you want to receive routing events
- Must be a valid HTTPS URL (HTTP allowed for development)
- Should respond with 2xx status codes for successful processing
Set Recipient Pattern
Configure Email Address Routing:Choose the email addresses to route using the recipient email address field:Specific Address:
support- Routes onlysupport@yourdomain.com
*- Routes ALL emails to the domainticket-*- Routesticket-123@yourdomain.com,ticket-abc@yourdomain.com, etc.*-support- Routeshelp-support@yourdomain.com,sales-support@yourdomain.com, etc.
Configure Processing Options
Customize how emails are processed:
Attachments
Attachments
Include Attachments:
- Enable to receive email attachments as base64-encoded data
- Significantly increases payload size
- Useful for document processing or file handling workflows
Headers
Headers
Include Raw Headers:
- Receive complete original email headers
- Useful for advanced email processing or compliance requirements
- Includes routing information, authentication results, and metadata
Strip Replies
Strip Replies
Reply Extraction:
- Automatically separate new message content from quoted replies
- Useful for conversation threading and clean content extraction
- Provides both full body and extracted reply content
Deduplicate by Message ID
Deduplicate by Message ID
Handle Multiple Recipients:
- Disabled (default): Separate request for each recipient (To, CC, BCC)
- Enabled: Single request per email regardless of recipient count
- Use when you want to process each email only once
Create and Secure Route
- Click “Create Route” to save your configuration
- Note the Route Secret displayed on the details page
- Copy and store the secret securely for signature verification
Save Your Secret: The route secret is shown only once. Store it securely in your application’s configuration for webhook signature verification.
Testing Message Routes
Verify your message routing integration works correctly:Use Test Events
- Go to your message route details page in the dashboard
- Click “Send Test Event”
- Verify your endpoint receives the test payload
Send Real Emails
Test with Actual Email Delivery:
- Ensure your domain’s MX records point to AhaSend
- Send an email to your configured address pattern
- Verify your endpoint receives the routing request
- Check the email content and metadata are correct
Security and Verification
Message routing follows the Standard Webhooks specification for secure payload delivery:Security Headers
Every routing request includes the same security headers as webhooks:webhook-id
webhook-id
Unique routing identifier - Use as an idempotency key to prevent processing duplicate routing requests from retries.
webhook-timestamp
webhook-timestamp
Unix timestamp when the routing request was sent - Use to reject old routing attempts.
webhook-signature
webhook-signature
HMAC signature of the payload using your route secret - Verify this to ensure authenticity.
Signature Verification
Use Standard Webhooks libraries to verify routing request authenticity:Standard Webhooks Compatibility: Message routing uses the same Standard Webhooks libraries as regular webhooks, so you can use the same verification code for both.
Message Route Payload Structure
All message routing requests follow the Standard Webhooks payload format:Complete Payload Example
Key Fields Explained
Email Metadata
Email Metadata
Core Message Information:
from- Sender’s email address and nameto- Recipient address that matched your routesubject- Email subject linemessage_id- Unique identifier from the email headersdate- When the email was sentsize- Email size in bytes
Message Content
Message Content
Email Body Content:
html_body- HTML version of the email (if available)plain_body- Plain text version of the emailreply_from_plain_body- Extracted reply content (if strip replies enabled)
Threading Information
Threading Information
Conversation Threading:
in_reply_to- Message ID this email is replying toreferences- Complete thread reference chainreply_to- Address to reply to (may differ from sender)
Spam and Security
Spam and Security
Content Analysis:
spam_score- Spam likelihood (0-10+, higher = more likely spam)bounce- Whether this is a bounce/delivery failure messageauto_submitted- Indicates automated emails (out-of-office, etc.)
Optional Data
Optional Data
Additional Information (if enabled):
attachments- Array of file attachments with base64 dataheaders- Complete raw email headerscc- CC recipients (comma-separated)
Common Use Cases
Support Ticket System
Support Ticket System
Automatically create support tickets from inbound emails:Route Pattern:
support or helpDepartment-Specific Routing
Department-Specific Routing
Route emails to different departments:Route Patterns: Multiple routes (
sales, support, billing)Document Processing
Document Processing
Process email attachments automatically:Route Pattern:
documents or upload
Settings: Enable attachmentsBest Practices
Error Handling
Error Handling
Robust Error Handling:
- Always return 2xx status codes for successfully processed emails
- Log processing errors for debugging and monitoring
- Handle malformed or unexpected email formats gracefully
- Implement retry logic for external service failures
Security Considerations
Security Considerations
Securing Your Routes:
- Always verify webhook signatures in production
- Sanitize email content before processing or storage
- Be cautious with attachments - scan for malware
- Validate sender addresses for sensitive operations
- Consider spam scores when processing emails
Performance Optimization
Performance Optimization
Optimizing Route Performance:
- Process emails asynchronously when possible
- Return 200 OK quickly, then process in background
- Monitor endpoint response times and success rates
- Implement proper logging and metrics
- Scale endpoints based on email volume
Troubleshooting
Emails Not Being Routed
Emails Not Being Routed
Check Route Configuration:Common Issues:
- Verify MX records point to AhaSend servers
- Confirm recipient pattern matches the email address
- Check route is enabled and not disabled due to failures
- Test with “Send Test Event” feature
- MX records not updated or propagated
- Typos in recipient patterns
- Route disabled due to endpoint failures
Endpoint Not Receiving Requests
Endpoint Not Receiving Requests
Verify Endpoint Configuration:Monitoring:
- Ensure endpoint URL is accessible from internet
- Check firewall settings and security groups
- Verify endpoint responds with 2xx status codes
- Test endpoint with curl or Postman
- Check AhaSend dashboard for delivery attempts
- Review server logs for incoming requests
- Monitor endpoint response times and error rates
Signature Verification Failures
Signature Verification Failures
Debugging Signature Issues:
- Ensure route secret is correctly configured
- Use raw request body for signature calculation
- Check Standard Webhooks library implementation
- Verify header extraction is working correctly
Route Disabled
Route Disabled
Automatic Route Disabling:
- AhaSend disables routes after 100 consecutive failures
- You’ll receive an email notification when this happens
- Fix underlying endpoint issues before re-enabling
- Identify and resolve the root cause of failures
- Test your endpoint is working correctly
- Re-enable the route in your dashboard
- Monitor for successful deliveries
- Monitor route success rates regularly
- Set up alerts for route failures
- Implement proper error handling and logging
Related Documentation
Webhooks
Track outbound email events and delivery status
Domain Setup
Configure domains and MX records for routing
API Reference
Complete API documentation for message routing